Branch Out This Christmas
by Laura Storey
Branch trees are great if you don’t have a lot of space or prefer not to have a Christmas tree. Discover how to create your branch tree...
These branch trees are great if you don’t have a lot of space, or prefer not to have a Christmas tree. They are excellent for the environment, because they are foraged and can be kept for many years, or put back for bees and bugs to live in.

You will need
MATERIALS
• A selection of branches around
• 1.5–3.5cm (5/8–13/8in) in diameter
• Ball of cotton string
TOOLS
• Scissors
• Handsaw or electric mitre saw
• Tape measure
• Ruler
• Pencil
• Sandpaper
• Stiff brush
Decoration ideas
• Wind fairy lights around each branch
• Tie baubles or homemade decorations along each branch
• Hang lots of paper snowflakes in different sizes from each level
• Peg advent pouches to the string
• Peg up your Christmas cards
• Make a huge string of tassels to fit along each branch
• Wrap foliage around each level to make it come alive
Step 1

Using a handsaw or electric mitre saw, cut nine branches to the following lengths:
75cm(29½in), 65cm (25½in), 55cm (21¾in), 45cm (17¾in), 35cm (13¾in), 25cm (9¾in), 15cm (6in), 10cm (4in) and 5cm (2in).
Remove any dirt and sand the cut ends so they aren’t too rough. Lay the branches out on the floor in size order, with the largest at the bottom. Allow roughly 15cm (6in) between each branch. If you plan to peg decorations to the tree, you can tie some string to one end of the individual branches and wind it around a few times before securing at the other end. This step is easier to do now than it is after you’ve attached the branches to each other.
Step 2
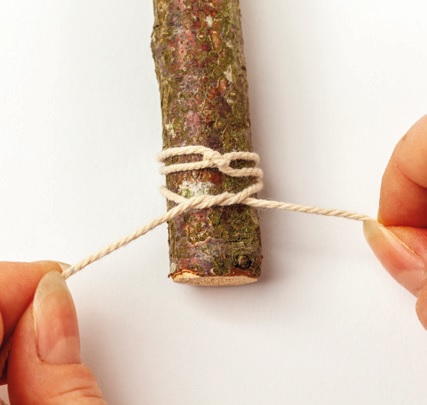
Cut pieces of string to lengths of 1.3m (1½yd). Take one length of string underneath one end of the bottom branch so that you have equal lengths either side.
Tie a double knot 2–3cm (¾–1¼in) in from the edge, making sure the knot is on the top aspect of the branch; then wrap either end once around the branch in either direction and tie another double knot on top of the last.
Repeat on the other end of the same branch.
Step 3
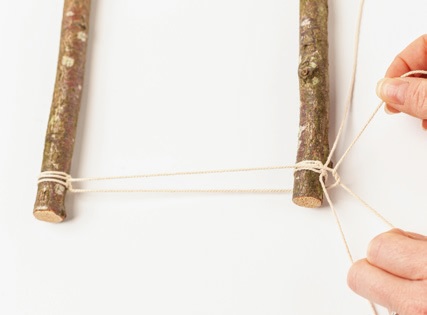
Repeat step 2 on both ends of every branch except the top one. Starting with the bottom branch, take both strings from one side up and tie a double knot through the middle of the two strings on the branch above. Have a ruler handy and measure 15cm (6in) between the branches as you go. Once you are satisfied with the spacing, wrap either end of the string once around the branch and tie another double knot on top of the last.
Repeat on the other end of the branch and then continue in the same way all the way to the top branch.
Once the tree is assembled, cut a 25cm (9¾in) piece of string for the hanger and attach it securely to the middle of the top branch. Now decorate your tree as you please.
Light it up!
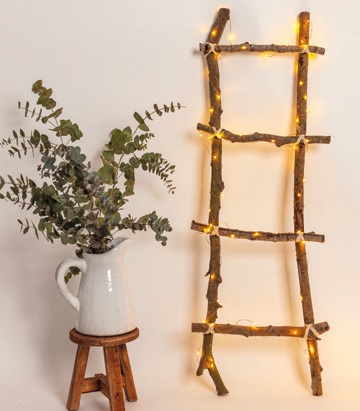
Using a similar technique, you can cut two long pieces from a straight branch and attach smaller lengths as ladder rungs. Use a crisscross pattern with the string to secure the ladder rungs onto the vertical pieces. This will make it more stable. Please note this is for decoration only and must not be used to climb on!
The Eco-Christmas Craft Book
Marianne Miall £12.99 Search Press
Craven&ValleyLife Winter 23